
DIY Cinnamon Ornaments For Christmas
Scents have an amazing ability to transport us back to a past memory or time. The smell of cinnamon can do that for a lot of people as it reminds them of Christmas. That’s why I love these easy DIY cinnamon ornaments. They have the ability to make your home smell amazing with the smell of Christmas all season long.

DIY Cinnamon Ornaments
Disclosure: This post contains affiliate links. As an Amazon Associate, I earn from qualifying purchases.
Like many people, I love scents. There is nothing better than to have your home smelling like a scent you truly enjoy.
I do enjoy burning candles like my spiral light candle now and then, but with a child and mischievous pets in the house having candles burning makes me nervous. Plus strong scents can trigger migraines for me. I much prefer to give my home a subtle scent like I get from these DIY cinnamon ornaments.
From as far back as I can remember my mother hung cinnamon ornaments up in our. We’ve always referred to them as ornaments, but we never actually hung them on our tree. Instead you’d find them hung in different parts of the house providing their cinnamon scents all over.
After I became an adult and had my own home I went many years without having any cinnamon ornaments of my own to decorate with. About six years ago though I decided I really needed to learn how to make these cinnamon scented ornaments myself.
Making these ornaments is actually pretty easy. It just takes some time to go through the creation process, and then it takes several days for the ornaments to be ready to use, so you’ll want to make sure that you make them before you want to use them. The good news is that the ornaments will add their amazing cinnamon scent to your home from the moment you start making them.

How Long Do Cinnamon Ornaments Last?
The wonderful thing about these DIY cinnamon ornaments is that if stored right they last a long time. In fact the ornaments themselves can basically last forever if you take care of how you store them.
What doesn’t quite last forever is the scent. If stored correctly the ornaments will still have scent and you’ll notice it every time you get them out to decorate with, but over time the smell perfumes the air less and less.
Not surprisingly their scent is strongest the year you make them. That’s when you can smell them when you walk into your house (depending on the size) and certainly the room they’re in. After that you’ll be able to smell them in the area where they are for several years. After the four or five year mark though you won’t really notice the scent very much. My ornaments were six years old this year and I decided to make some new ones to pump up the scent again.
How To Store Christmas Cinnamon Ornaments
How you store your Christmas cinnamon ornaments once the holiday is over is the biggest factor in how long your ornaments will last. I find the best way is with a large Ziploc bag. I like to use the gallon storage type ones.
When you take the ornaments down place all of the ornaments in the baggie together. Then push the air out of the baggie and seal it. Finally store the baggie in a place where they won’t get crushed. I always have a tub of Christmas decorations that are all items that fragile and can’t be crushed. That keeps them all safe together and I always know to place that box on top of all the others once they’re stored away.
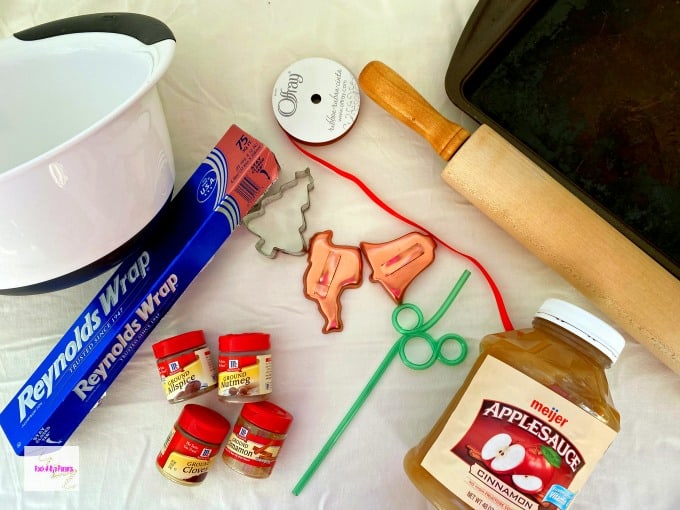
Supplies Needed To Make Cinnamon Scented Ornaments
- 3/4 Cup Cinnamon – Yes, you need to have a lot of cinnamon!
- 1 Tablespoon Ground Allspice
- 2 Tablespoons Ground Cloves
- 1 Tablespoon Ground Nutmeg
- 1 Cup Applesauce
- Straw
- Aluminum Foil
- Cookie Sheet
- Mixing Bowl
- Rolling Pin
- Christmas Cookie Cutters
- Ribbon
How To Make the Cinnamon Ornaments
As I mentioned before making these ornaments really isn’t too hard. It does take some time though, but continually rolling the dough and using holiday cookie cutters will really get you into the Christmas spirit!
First you need to take all of the spices and mix them together in a large mixing bowl. You do need a lot of cinnamon to make these, so make sure you have enough on hand before you get started.
Once the spices are mixed you are going to add the applesauce to the spices. A first the dough might continue to seem dry, but after enough mixing it will become quite moist. What you want is a dry but workable dough.
Some applesauces can be runnier than others, so it helps to add it a bit at a time, mix, and then add more. That way your dough won’t get too watered down.
This dough can get quite messy, and most especially sticky, so I find it helpful to roll the dough out on some aluminum foil. You don’t have to use the aluminum foil, but it will make counter clean up a lot easier when you’re all done.
At this point you want to roll your dough out, and you want it to be about 1/4″ thick. When you think you think the thickness is ready you can take your cookie cutters and start cutting out shapes in the dough just like when you make Christmas sugar cookies.
Once you’ve lifted the cookie cutter up you’ll want to make the hole for hanging the ornament. A straw is the best way to do this. Simply find a good spot on the ornament somewhat near the top. Push the straw in and create the hole. You might need to twist just a little. Once the hole is made just blow through the top of the straw to push the dough out of the bottom of the straw.

Once you’re out of space to add more cookie cutter shapes, and all of the shapes have a hole, it’s time to place the ornaments on a large cookie sheet to dry.
Continue to reshape and roll the dough out until you can’t get any more shapes out of it. With the remaining dough make small dough balls. You can later spread these throughout your home to create some more scent.

Once you’re all done you want to leave the ornaments on the cookie sheet to dry for 24 hours without touching them. After the 24 hour point you need to flip them over so. You’ll then continue to flip them over every 12 hours until they are completely dry.
When you flip them you’ll see a wet looking area on the side that was on the cookie sheet. You’ll know which ornaments are fully dry and ready to hang when you don’t see that wet area any more. Usually it takes four to five days for the ornaments to be fully dry and ready.
While these are meant to be no-bake you can hasten the drying by baking them. If you want to bake them put them on the cookie sheet and then place it in the oven at 180 degrees for 4-5 hours. The ornaments will need to be flipped every 15 minutes.
Once your ornaments are fully dry (and cooled if you baked them) take a small sharp knife and trim any jagged spots. This will help give your DIY cinnamon ornaments nice and smooth edges.
Finish the ornaments by threading a piece of ribbon through the hole of the ornament. Where you plan to place the ornaments will dictate about how long you’ll want the piece of ribbon to be. If you’re going to hang them on the tree it doesn’t need to be very long.
At this point you are all done. Now you can hang the ornaments on your tree or other locations of your home to enjoy the subtle cinnamon scent through the holiday season.

More Ways to Make Christmas Special
- DIY Christmas Gift Wrap Kids can Make – from Carrie Elle
- Letter to Santa Printable with Traceable Letters for Beginning Writers
- Puzzle Wreath Ornament to Show off those School Pictures!
- Snowman Pancakes with Peppermint Syrup for Christmas Morning
DIY Cinnamon Ornaments
With these DIY cinnamon ornaments you can give your home the scent of Christmas all season long.
Materials
- 3/4 Cup Cinnamon
- 1 Tablespoon Ground Allspice
- 2 Tablespoons Ground Cloves
- 1 Tablespoon Ground Nutmeg
- 1 Cup Applesauce
- Ribbon
Tools
- Straw
- Aluminum Foil
- Cookie Sheet
- Mixing Bowl
- Rolling Pin
- Christmas Cookie Cutters
Instructions
- Blend spices in a large mixing bowl
- Mix in applesauce to make a dry but workable dough
- On aluminum foil roll the dough out - you want it to be about 1/4" thick
- Use cookie cutters to cut out shapes in the dough
- After each one is cut out insert a straw to make holes for the ribbon
- Once it is cut out, and the hole has been added, place the ornament on the cookie sheet to dry
- Continue to reshape and roll the dough out until you can't get any more shapes out of it - with the remaining dough you can make small dough balls
- Leave the ornaments to dry for 24 hours without touching them, and then flip them every 12 hours until they are completely dry - You can hasten the drying process by putting the cookie sheet in the oven at 180 for 4-5 hours flipping them every 15 minutes
- Once your ornaments are fully dry (and cooled if you baked them) take a small knife and trim any jagged spots so that the edges look smooth
- Thread a long piece of ribbon through the hole of the ornament
- Hang your ornaments and enjoy the holiday scent!


What a great idea. The grandkids would love this because they get to do all the messy stuff at their grandma’s house!
What a wonderful idea! Scents are an important part of the holiday to me, and this is such a festive way to enjoy them. It’s perfect for places where a candle wouldn’t be practical.
They’re really great for homes with small kids too since you get the scent without the flame.
I love this! I make sugar Cookies at X-Mas for my Husband already,but these would give my house such a good smell!
They smell great. I love to walk by them and smell them. It’s the best!
Cute and I love the smell of cinnamon! Thanks so much for stopping by and sharing on Family Friday Link-Up Party!!!
I am also a big fan of nice scents. Salt dough ornaments are fun, but I love that you added the fragrance of the season too. I found you through the Friday Linkup. I will start following you on bloglovin’ as well. Enjoy the season!
The fragrance is truly what makes them so great. Thank you so much for the follow Natalie. I have followed you back.
Great idea!!!Well done!
I love the smell of cinnamon. I think this would be a very fun way to decorate for the holidays.
They’re great because there are so many different places that you can use them!
LOVE the smell of cinnamon…who doesn’t?? I’m not crafty or a baker, but this would be a great project with the kids over the holiday break! Writing this one down! (Visiting from Blogging Bunch…sorta..since I follow you, too. 🙂 …..)
I love the smell of cinnamon, but I think my dog would try eating these if I made them! They do look fun though
We don’t have a dog, so I hadn’t even thought of that. It could very well be hard to leave them out to dry then.
Great idea! I’m going to make these with my kids in the next couple of weeks!
I remember making these when I was younger. I loved how they smelled. Unfortunately the ones we still have at my moms house no longer smell ( yea, it’s been that long ago)! What a great activity to do with the kids though!
It is a fun activity. Maybe you could make some fresh ones for your mom. 😉
My mother used to make cinnamon ornaments growing up, they smell wonderful! Great idea, I should make some with my boys this year!